Sunday, December 17, 2017

WWII German Army Regulations on Cleaning and Maintenance of Uniforms and Equipment


This material is translated from the 1943 edition of the Wehrmacht manual "Hilfsbuch für den Hauptfeldwebel" by Hans Rödel.

Instruction Sheet Regarding Care and Upkeep of Clothing and Equipment Items

1. Means for individual cleaning and maintenance of clothing and equipment

Enlisted men are to obtain by their own means the following commercially available goods, and to constantly keep them in usable condition:

1 large clothing brush (Kleiderbürste), 1 stiff brush for removing dirt (Schmutzbürste), 2 small brushes (Auftragsbürste), 1 polishing brush (Blankbürste), 1 bristle brush (Borstenbürste), 1 clothes whip (Klopfpeitsche).
Shoe cream or shoe polish, leather fat, curd soap (Kernseife).
1 pair scissors, sewing and darning needles, darning yarn, black white and gray thread, various buttons.

2. Cleaning and Maintenance of individual uniform and equipment pieces

I. General

The soldier is obligated to keep the uniform and equipment items in his possession well and carefully maintained. The soldier himself has to care for the cleaning of his underclothing and must pay for the cleaning costs out of his own income. The cleaning of the remaining items issued to the soldier for his use is also his responsibility, insofar as he can clean them with water, soap, etc. - or if need be, with a soft brush.

All items must be kept constantly maintained. Every soldier must himself perform small repairs on the uniform and equipment items he was issued, as long as these do not require specialized craftsmanship knowledge to be repaired, for example replacing buttons, replacing hooks and eyes, sewing split seams. The necessary supplies must be provided through his own means. Larger maintenance tasks are to be given to the Bekleidungsoffizier promptly, meaning when the damage first happens.

II. Cleaning of uniform pieces

Underclothes: Underclothes and sports shirts should soak in cold soapy water for a long time, at least overnight. A brush may not be used for the cleaning of underclothing and sports shirts. Sports shorts and swim trunks, collar binds, helmet bands and arm bands are not to be boiled, rather just washed by hand in warm soapy water (without a brush) and then rinsed.

Knit wool items: All knit wool items should be washed in lukewarm water or soapy water. Boiling or the use of hot water or brushes is forbidden, this causes the wool to become matted.

Wool uniform items: Wool uniforms should whenever possible not be washed. They are cleaned by brushing and by beating with a clothing whip. The use of wire brushes is forbidden. Stains can be removed with gasoline or diluted Salmiak (ammonium chloride). The Exerziergarnitur (uniform for field use) may be cleaned with a short-trimmed bristle brush and soap in places that are heavily soiled.

HBT uniform items:
HBT uniforms can be cleaned with a bristle brush and soap in hot water, but long boiling is to be avoided.

Bread bag: The bread bag is to be cleaned with a soft brush, warm water and Kernseife (curd soap). Drying the bread bag near an oven is to be avoided, as this makes the leather straps brittle.

III. Care of footwear

Leather uppers that are poorly cared for, or that have been improperly cared for with inferior, poorly-suited care products, become hard and brittle. Hard upper leather is in most cases the root cause of the formation of hard creases and foot damage. The soldier is obligated to keep the footwear items in his possession well and carefully maintained.

Greasing: The leather of footwear must be kept soft. It is necessary to treat the upper leather at least once a week with acid free leather oil or leather fat. Before doing this, dirt and any remaining traces of polishing product must be removed by washing with lukewarm water. Excessive use of grease should be avoided, otherwise the product will soak through, soil the interior of the footwear, and also, in warm weather, lead to burning, formation of blisters or sores on the feet.

Cleaning: The use of shoe polish on the foot part is to be limited to the smallest amount possible. Polishing work may only be done with a brush or cloths. Use of other products and the working of a "high gloss" finish on the foot part, are forbidden. A very light dusting of grease on the foot part during the daily cleaning results in a soft, march-ready boot. Wet-washing or rinsing of the interior leads to disintegration of the sole and with that, foot damages.

Treatment: Drying wet footwear in the vicinity of a heated stove, a radiator, etc. is forbidden. They should be stuffed with paper or straw and as much as possible aired out or put in a slightly warm place to dry. Before doing this, no product should be applied to the footwear. Wet footwear is not to be stretched out on chair legs, etc., as this deforms the wet leather at the rear seams. The boots can be put on by helping each other by hand, or with a boot jack. Bed and table parts, etc. may not be used for this, as it puts pressure on the caps of the heels. By stepping on the tip of the foot, it puts pressure on the upper leather and brings about rubbing on the toes.

IV. Miscellaneous

Overcoat: The rolled overcoat must immediately be unrolled upon return.

Mess kit, canteen and drinking cup: Never store the canteen for a long time. When cleaning, abrasive products like wire brushes, metal polishing cloths, sand, etc. are not to be used. The simplest materials are water and brushes. After cleaning, it is good to rinse with water that is as hot as possible, and wipe completely dry. Mess kits and canteens are not to be kept closed with moisture inside. With use, the inside of the mess kit will develop a yellow-brown to gray-black visible coating (oxidation layer), that has no effect on the taste, the appearance or the quality of food. It protects against being worn out and may not be removed.

Thursday, December 14, 2017

WWII German Wehrmacht trenches, shelters, field fortifications

Some illustrations taken from wartime German manuals on constructing field fortifications.

A schematic drawing of a trench line. In the illustration at top, the camouflage has been removed.
Trench features. 1: A trench in which one must crawl. 2: A connecting trench. 3: A niche for a rifleman. 4: A niche for ammunition.
Shelter made of wooden boards, for 6 men sitting or 3 men lying down.

Observation position, also made of boards.
Simple field shelters. 1: Simple dirt hole for one man. 2: "Heinrich" position made of corrugated sheet metal, for 3-6 men. 3: "Siegfried" position made from sheet metal.
More simple shelters. 4: Position made of 8 cm diameter logs, for 2-3 men. 5: Position made of flat corrugated sheet metal or logs, showing 3 stages of construction. The work had to begin at night, the later stages could be worked on also during the day.
Shelter made of wood with a corrugated metal roof, for 3 men lying down, or 6 men sitting.
A larger version of the "Siegfried" shelter made from sheet metal frames.
"Heinrich" shelter.
A larger "Heinrich" using two corrugated metal sheets.
A Schützenloch (what in the US military might have been called a "foxhole") for two riflemen.
Schützenloch for a light machine gun, such as an MG34 or MG42.
Another diagram showing an MG position, also for a gunner in a standing position.
A more sophisticated machine gun position, a "Ringstand" built from logs.
A log machine gun bunker.
Details of the above bunker.
Holes for riflemen and for shelter from tanks. 1: For firm ground. Riflemen positions on the left, machine gun positions on the right. 2: For softer ground.
This table lists 12 kinds of field fortifications. For each type, it is indicated how many cubic meters of earth had to be moved, how many men each would take to build, how many hours each would take, and what tools were needed. For the more complicated positions, it also lists what building materials were required. The chart at upper right indicates how many cubic meters of earth one man could move in an hour, depending on how hard or soft the ground was. A man could move more earth in one hour than what he could move per hour if working for hours.
An illustration of dummy positions that were to act as decoys. I have added a translation to this original illustration.

Sunday, November 26, 2017

Wehrmacht Regulations on the Fit of Uniform and Equipment Items


Overview of the Fit of Clothing and Equipment Items

[Translated from "Hilfsbuch für den Hauptfeldwebel" by Hans Rödel, 1942. Translated by Chris Pittman]

Field cap: The cap is to be worn slightly tilted to the right, in such a way that the lower edge is 1 cm over the right ear and 3 cm over the left ear, and about 1 cm over the right eyebrow as seen from the front. The cockade is in line with the center line of the face. The cap must fit in such a way that the back of the head is covered.

Visor cap: The cap should sit horizontally on the head as seen from the front, the cockade in line with the center line of the face. It must be large enough to cover the back of the head. The lower edge of the visor should intersect the eyebrows at its lowest point.

Field blouse: The field blouse must fit over the wool sweater in such a way that it is wide and blousy in the torso, and the man is not hindered in his movements. Folds created when the belt is fastened are to be distributed in such a way that they do not press on the body. The belt buckle sits between the two lower buttons. The blouse should just cover the buttocks. The arm hole is large enough that the man can freely move his arms without causing pinching in the armpit. The lower edge of the sleeve extends to approximately 3 cm below the wrist. The collar bind should extend about 0.6 cm - 1 cm over the collar edge.

Waffenrock: The Waffenrock must hang freely in the skirt, without causing folds in the front and without jamming. The middle seam should be about 1 cm over the hips in such a way that the lowest front button should be covered by the belt. The arm hole is large enough that the man can freely move his arms without causing pinching in the armpit. The lower edge of the sleeve extends to approximately 3 cm below the wrist. The collar must be large enough that a collar bind can be worn. It must not protrude on the sides or in front. The shoulder boards should lie on the center of the shoulders. The skirt should cover the buttocks.

Overcoat: The overcoat should reach the center of the lower leg. The fastened belt lies above the rear belt and leaves it free. The sleeves extend 1-2 cm past the jacket sleeves. The collar sits lightly on the jacket collar in the rear and in the front must be loose enough that you could fit a flat hand between the jacket collar and the overcoat collar. The shoulder boards should lie on the center of the shoulders.

Collar bind: When the field blouse is open, the collar bind is buttoned to the 5 buttons in the neck hole of the jacket, and is visible about 1 cm all the way around. Both ends must be long enough that they extend at least to where the neck opening is closed. When the field blouse is closed, the collar bind remains buttoned to the three rear collar buttons of the field blouse. It should be visible over the collar about 2-3 cm in front, and elsewhere around 0.6 cm all the way around.

Wool trousers: The trousers should pull moderately tightly against the rear split. The lower ends of the legs may only extend to the upper edge of the boot heel in the rear, they may not bulge in the front. The rear closure belt must sit tight above the hips and the fastened leather belt must lie on the trousers beneath the buttons.

Boots: The boots must fit tight in the heel and along the length, to avoid squeezing. When walking, the heels lift a little from the sole and may not slip up and down. The tips of the boots or shoes must offer 1-1 1/2 cm space when toes are fully outstretched. With jack boots, do not choose too narrow shafts.

Belt: The belt sits on the rear belt buttons of the Waffenrock, on the belt hooks of the field blouse, with the overcoat the hooks on the field blouse are pulled through the slits and the belt sits on that, the belt sits over the waist strap. The bayonet frog sits a little in front of the left side belt hook on the field blouse, with the overcoat and Waffenrock it is worn in the corresponding place. The middle of the eagle on the belt buckle is in line with the front closure buttons on the Waffenrock and field blouse, with the overcoat it is in the middle of the two button rows. With the Waffenrock, the buckle covers the lowest button, it should be between the two lowest button on the field blouse, an on the overcoat it should be between the two lowest button pairs.

Helmet: Seen from the front, it should be 1 cm over the eyebrows. From the side, it covers half the ear.

Tornister: The Tornister is fitted with the rolled overcoat. The upper surface intersects with the lower collar edge, the lower edge of the Tornister should come to around the middle of the belt. The carry straps and auxiliary straps should not pinch and should not cut in under the arms.

Awards: The marksmanship lanyard is worn from the right shoulder to the second button on the Waffenrock or field blouse. Rank badges on the sports suit: horizontally on both arms, 12 cm beneath the arm hole, a 15 cm long and 1 cm wide strip of white cotton for NCO ranks. Rank badges on the sports shirt: Around the neck opening, a 1 cm wide black twill band for NCO ranks.

Thursday, November 23, 2017

WWII German book on orienteering: "Karten- und Geländekunde" (Maps and Landforms)

Undated WWII-era German manual, "Maps and Topography." This does not appear to be a military issue manual, but there is information here about reporting, so clearly this was geared towards military/paramilitary use. Topics covered: Maps, landforms, orienteering in terrain using a map, the preparation of sketches. This is a scan of the original, German language of course.

Download "Karten- und Geländekunde" as PDF

The story of the "Westwall ring"

How the Westwall ring came into being

(From "Wir von der Westfront," 1940.)
They sat together in the rooms, the men of the Westwall. All day, they had dug trenches, fortified bunkers and covered the border against the enemy with a net of iron wire. Now it was a free evening. Some wrote, some sang, some whispered, some dreamed.

Among the men was also a goldsmith. Gottfried Grau, he was called. He came from Pforzheim. This Gottfried Grau had brought a piece of "warrior's gold" into his room with him: a piece of iron wire. Like a toy, he wound the shorter end of this wire into a ring, and bent the longer end with a file into a spiral, which soon lay like a rosette on the narrow ring. Then he put the ring on his finger and regarded it with scrutiny, like a piece of jewelry from his old workshop.

The other men started to notice this. They looked over the shoulder of the goldsmith.

"It is beautiful, this ring," a young man said dreamily. "It suits us."

After Gottfried Grau finished his duty on the Westwall, he returned to his home city. As he bid his comrades farewell, he thought about the iron ring he had made. He took it out of his pocket and gave it to the young man. "In memory!" he said seriously.

When a year was over, Gottfried Grau came back to the Westwall, but this time not as a trench worker, rather in the gray jacket of a soldier. When he greeted his new comrades, he noticed that some of them wore an iron ring with a wound spiral. Such a ring as he had once made and given as a gift. He asked the soldiers about the origin of this jewelry. They couldn't say. Someone had seen someone else wearing it, and one got the feeling that this ring had a deep meaning and tried to make one. So arose many such rings, "Westwall rings" as they were simply called by the soldiers.

Gottfried Grau knew that his trained fingers could do good work here. From now on he spent his free time in the weapions maintenance room, making Westwall rings. The soldiers helped him with it.
And when today, when they put a self-made ring on the finger of their comrades, the officers and the men, they say then: "In memory!"

And it sounds as a promise to cameraderie for all time.


Sunday, November 12, 2017

More original WWII Wehrmacht field kitchen recipes


Last week I posted some simple original wartime German field kitchen recipes. Here are some more recipes from wartime cookbooks. Translations are mine.

There is a mix here of meat and vegetarian dishes, stuff that does and does not require refrigeration, that uses fresh or canned meat, that would be very simple to make in the field or that would require some more effort. These are all simple field type recipes for traditional German fare. You can see that the recipes are made to be flexible and can be varied and adapted depending on availability of ingredients, or just to add variety.

Translated from the book "Oestliche Speise nach deutscher Art":

RECIPES FOR WHITE CABBAGE

Bayrisch-Kraut: Clean and quarter the cabbage, remove the core and slice into thin strips. In hot fat, cook 1 tablespoon of diced onions. Add the prepared cabbage and bring to a boil with a little water. Add salt and coriander, cook until done. Add a sweet and sour taste by browning a little sugar, add vinegar with water and season with pepper. Mix this well with the cabbage. Thicken with raw grated potatoes or stir in potato flour and bring to a boil again.

White cabbage, stewed brown: Chop and slice the cabbage as for Bayrisch-Kraut and cook in fat. In a little meat broth, add 1 small onion, 1 small carrot, a little thyme, bay leaves and crushed garlic. Cook this for 30-40 minutes. Heat some fat in a pan and add flour to make a gravy, use this to thicken the broth/seasoning mixture. Pour this through a sieve over the cabbage and boil until done. Add a shot of Crimean or Caucasian wine.

Kraut-Salat: Clean and quarter the cabbage, cut in fine strips. Blanch in boiling salt water. Drain and let cool. Mix with vinegar, oil, finely chopped onions, salt, pepper and coriander. Season to taste.

Translated from the book "Die Feldkuechengerichte - Nach dem Original-Feldkochbuch des OKW 1941.":

STEWS

(Note: all indicated measurements are for 1 portion for 1 person)

With fresh, pickled, smoked, or frozen meat: Remove the bones and put them in cold water, add herbs or vegetable waste (such as cabbage cores, celery leaves, cabbage leaves or onion peel) in a linen or net bag. Bring to a boil to make a broth. Add salt. Cut the meat into 2-3 kg pieces and add to the boiling broth. Never put pickled or smoked meat in salt water because it releases salt during cooking. Cook the meat without vegetables until done, then remove the meat from the broth and keep warm.

Add vegetables to broth and cook until done.

Season depending on the type of dish.

Before serving, slice the meat into portions. Every soldier wants to see his portion of meat.
Using canned meat shortens the cooking time ,as canned meat is pre-cooked. When seasoning, keep in mind that canned meat is already salted and seasoned.

POTATO STEWS

Put fresh meat, pickled meat, or smoked meat in boiling water and cook according to the above directions. Cook 1500 g potatoes in broth or water. If using canned meat, add to finished dish. Season with salt or chopped fresh herbs before serving. If you have dried herbs, cook them in the dish for only a short time. Or, add roasted onions to the finished dish.

Tomato potatoes: season the finished dish with up to 25 g tomato paste.
Potatoes with pickles: Dice 50 grams of pickles (about 1/2 a medium pickle) and mix into the finished dish just before serving, do not boil.
Onion potatoes: instead of using herbs, add up to 10 grams of fresh onions or 2 grams of dried onions, and cook together with the dish. Roast the onions before adding them if possible.
Celery potatoes: Add up to 50 grams of fresh celery or 5 grams of dried celery to the dish an cook together (reduce the portion of the other vegetables accordingly).
Sour potatoes: Boil the dish together with bay leaves and allspice, season the finished dish with vinegar.

Variations:

For 90 g sauerkraut and 1200 g potatoes: add raw finely chopped sauerktraut to finished dish shortly before serving.
For 400 g cabbage or 400 g green beans or 400 g other vegetables and 1000 g potatoes: The vegetables can be pre-cooked in water or broth until done.

VEGETABLE STEWS

Put fresh meat, pickled meat, or smoked meat in boiling water and cook according to the above directions. Cook 600 g fresh vegetables or 30 g dried vegetables together with 750 g fresh potatoes in boiling broth or water. If using canned meat, add to finished dish. Season with salt or with onions cooked with the dish. If using fresh chopped herbs, add them to the finished dish.

Variations:
800 g white cabbage and 500 g potatoes: cook with caraway seeds.
800 g carrots and 500 g potatoes: cook with marjoram
600 g rutebaga, 75 grams noodles, and pickles: Cook noodles, rinse, then add to the rutebega. Add the pickles to the finished dish.
600 g carrots, 250 g potatoes, 50 g dried peas: Soak the peas, cook in broth. Boil carrots and diced potatoes together with the peas. Add finely chopped parseley.
300 g sauerkraut with 500 g potatoes or 300 g sauerkraut with 50 g dried peas: Cook the potatoes or peas, add sauerkraut and boil together. Cook with juniper berries.

ROULADEN
Pound out cuts of meat, coat with mustard, fill with ground beef, onions or pickles, roll them up, put them close together in a pan and fry. Remove from pan, roast some onions in the hot pan. Mix these with seasoned broth, return the Rouladen to the pan, cover with the broth and onions and braise. 20 minutes before done, thicken the broth with some flour. Thyme, or allspice, vegetables cut into strips and braised together with the meat, buttermilk and red wine improve the flavor.

GROUND MEAT

The best combination for this is a mix of 2/3 lean beef and 1/3 medium-lean pork. Slice the lean meat into pieces, season with salt, pepper and marjoram and run through a meat grinder. Knead the meat together with some cold broth, water or milk. Then grind the pork together with some onions and mix that in.

You can extend ground meat with soybean meal. 4 parts meat to 1 part soybean meal. You could also use white bread or Zwieback. Soak 1 kg white bread or Zwieback in 3 liters of water, then press out excess water. 3 parts meat to 1 part soaked bread.

Koenigsberger Klops: Make the ground meat into meatballs, boil for 15 minutes. Make a white sauce using the broth and a roux made of flour and fat. Season with lemon or vinegar, pickle juice, white wine, capers, herring or sardines.

Fried meatballs: Form the ground meat into balls, press a bit flat and fry in hot fat. To make it easier and save fat you can just brown the meat on both sides and then allow to cook in a sauce.

Kohlrouladen: Blanch large cabbage leaves in salt water until they are flexible but not soft. Remove and spread on a cutting board. Cook the small cabbage leaves until done, chop, mix with ground meat. Make narrow long meatballs from this mixture, put them on the cabbage leaves, roll together and cook like meat Rouladen.


Thursday, November 9, 2017

Simple WWII German recipes for Schweinebraten, Gulasch, and meatballs


The Oberkommando des Heeres published a cookbook called "Oestliche Speisen nach deutscher Art" (Eastern Dishes in the German Style) for German personnel serving in the occupied East. The book included instructions on how to cook in Russian home kitchens and had a mix of German recipes that could be made with locally available ingredients, and local recipes. We have previously posted a Borscht recipe from this cookbook. Here are some meat recipes. Translations are mine. Note that these recipes are deliberately vague so as to be adaptable based on availability or simply taste. Any of these are easily prepared over a fire with very minimal equipment required.

Schmorbraten

Cut the meat into as big pieces as possible. Brown on all sides in hot oil, season with salt and pepper. Remove meat from pan and keep warm. Add coarsely chopped root vegetables to pan and brown well. Dust with flower and mix together. Add water or broth and bring to a boil. Put the meat back in and cook with gentle heat until it is done. Season with bay leaves, juniper berries, allspice and/or peppercorns. Add wine to taste.

Gulasch - Basic recipe with fresh meat

Dice the meat, add salt and pepper, fry in a little oil. While browning, add finely chopped onions, a teaspoon of tomato paste, a little paprika, and roast together. Cover with water and braise until done. Add flour to thicken and bring to a boil, simmer until done.

Variations on Gulasch:

1. Gulasch with bell peppers. Add 1 chopped bell pepper for the last 30 minutes of cook time. Or, add 1-2 canned peppers, sliced, to the dish at the end just until heated.

2. Szegediner Gulasch. Add 1/8 kg of sauerkraut per person to the dish at the end just until heated.

3. Gulasch with vegetables. Add fresh or dried vegetables, even pumpkin, and cook together. Soak dried vegetables before using. Canned vegetables can be added at the end just until heated.

4. Serbian Rice Meat. Use veal if possible, seasoned with paprika. Add 4-5 tablespoons of rice (about 100 grams) in the last 20-25 minutes of cooking. Or instead of rice you can use risotto, just mix it into the finished dish.

Gulasch from canned meat

Meat in cans is pre-cooked. Because it is usually very fatty, you can make it more productive with this sauce: Roast chopped onions and 1 teaspoon tomato paste in a little fat. Add 1/8 liter water and bring to a boil. Thicken with flour, use 10 grams of flour per 1/8 liter water. Bring to a boil again, cook until done. Season with pepper or paprika. In this sauce, add the canned meat just to heat it up.

Meatballs from fresh meat

Grind the meat in a meat grinder. Add salt and pepper and mix well. Add bread crumbs or soaked bread, finely chopped onions, egg or just egg whites or egg substitute. Mix well and form into balls. Coat with flour or bread crumbs and fry in hot fat until done. The meat mixture tastes best when the onions are cooked and it is seasoned with available herbs. The meat can be extended with finely clopped and mixed in cabbage cores or other vegetable waste, without sacrificing goodness.

Meatballs from canned meat

Finely chop the meat and leave it to dry in the air for a little while. To cook, use the same recipe as for fresh meat but you must add flour.

Wednesday, August 9, 2017

Perspectives on reproduction uniforms

The first WWII reenactors used original and converted postwar items. As originals became more expensive and more scarce, converted postwar uniform items came to dominate the hobby. The first reproductions, made in Germany and the USA, were a huge improvement over converted Swedish wool. The most authentic units soon began to stipulate that their members must wear reproduction uniforms (as opposed to Swedish). It was generally not necessary to stipulate what manufacturer the uniform had to be obtained from, because choices were extremely limited and the available choices were mostly roughly equivalent in quality. Because many sellers had long lead times, a reenactor's choice usually was determined by availability. 

In the late 90s and early 2000s, reenacting was in a period of rapid growth and demand for uniforms was extremely high. The pice for a new field blouse at that time was around $350. Starting around 2004 (give or take a few years) a number of suppliers began to have uniform items made in China, in an attempt to meet the burgeoning demand with a lower price option. Most of the Chinese made stuff was absolutely terrible, Halloween quality. The field blouses appeared to have been made from photos of originals, the details simply were not there, shirt weight wool/poly blend fabric with plastic buttons. For the first time, reenactment units had to specify which reproduction uniforms were and were not acceptable. More and more manufacturers were coming on line and the reenactor for the fist time was faced with a wide array of choices. A new hobby paradigm developed that heavily focused on what gear was acceptable and what was the best. 

Even a child could have seen that the first wave of China-made reproductions were not correct for WWII. But the product quickly improved. Sturm and other vendors began to offer cheap imported products that appeared very similar to those made in the USA. The existing sellers suddenly had to make the case that their field blouses were still worth $350 when you could buy a China made copy for $150 or less. In the rush to disparage the cheaper copies, much reenactor myth and lore was born- much of which echoes down to the present day. 

Let's look now at 2017. The Chinese made cheap uniforms have killed off some businesses, and the sellers that remain have had to turn to having their products largely made overseas. Constant improvements to the cheap uniforms over many manufacturing runs are yielding products that are in most cases superior to the high-end products of 2004 and earlier. The quality difference between the uniform items offered by most manufacturers is extremely small. None are exactly identical to originals but most are extremely close. And yet, the paradigm of obsession over "the best" and which manufacturer offers the most prestigious product still stands. It's an old model of thinking, it's outdated, and we need to get past it, because it is a pitfall for people. 

It was also a pitfall for me. Some USA vendors disparaged Sturm products by saying that they were based on a modern suit jacket and that the shoulders were wrong and the arm holes too big. I repeated this line, I took it as gospel. Only years later did I actually compare Sturm arm holes to originals and discover that they are the same size. It was wrong of me to parrot this bad information. It is still possible to find old posts of mine on the Axis History Forum in which I make statements that are uninformed. My erroneous conclusions were based on study of a tiny number of originals, and dealer propagated myth and lore that I was foolish enough to take as gospel. 

The best uniform is the decent copy that you buy and then tweak and break in and wear and make your own. The decent copy is a blank canvas for your effort to make something that looks realistic. Decent copies are available from almost any manufacturer nowadays. There are some specific exceptions to this, of course. But the old style hype about certain sellers and manufacturers is hype that is not based on fact, and I think it is well past time that we as a community acknowledge that. When we look at (for example) a Heer field blouse, the reality is that insignia choice and application method is almost certainly going to have a greater impact on overall realism, than who made the blouse! 

Original uniform items are in most cases not rare. Original M43 tunics are widely available and accessible. Lots of collectors are happy to share photos and information about the items they own. Unfortunately we are still stuck in a mindset of disparaging copies based on suppositions and lore. If the arm holes on a tunic are too big this is something that we can actually objectively measure and quantify. We can look at original tunics and determine if arm hole size is scaled and graded based on chest size or tunic length, and we can collect data on arm hole sizes and determine what size the arm hole should be on any given tunic size. Unfortunately nobody has ever collected data like this or really done anything like this at all and most of the assessments posted here or anywhere are based on comparing reproductions to other reproductions, or on repeated myth and lore. 

Fact: nobody has ever been able to list an objective reason why ATF tunics or caps are inferior to any other copy. The same can be said for many products made by many other manufacturers. If anyone has given one objective reason backed by data why Hessen field caps are wrong, or Gavin caps, or Sturm caps, or caps from 3_reich on eBay- I haven't seen it. 

I would put my field blouse against any other anywhere in terms of realism. It is made by Sturm. Is it better than an ATF blouse? It is, but only because of the work I have put in. I could have started with an ATF or custom Gavin and the end result would have been the same. In the absence of actual objective quantifiable data points to the contrary, they are all equally good.

Sunday, August 6, 2017

Original equipment photo

This is an unattributed photo that I refer to, to help inform my equipment setup at events where I march in/out with my gear. The M34 Tornister by regulation was supposed to have the mess kit in the pouch inside, this worked great for gear kept in a barracks locker but obviously in the field it was impractical. The curled-under strap ends shown here were regulation. I use equipment straps rather than bits of string for my blanket roll.

Tuesday, June 6, 2017

Recipes from the "Kriegskochbuch" (war cookbook), 1915

The following recipes are from a German "war cookbook" of 1915. The idea behind this cookbook was to provide options for simple, cheap meals, with ingredients obtainable in austere wartime conditions. These recipes were not created from nothing in 1915, and they did not diappear afterward- they are rooted in German traditional cuisine, and simple meals like this were served before WWI and also during the depression, in WWII, and beyond.


All recipes serve 4 portions.

Cabbage Soup

One small head Savoy cabbage or white cabbage
2 tbsp. fat
4 tbsp. flour
1-1/2 ltr. water
Pinch of pepper, salt

Clean cabbage, cut in strips, wash. Heat the fat, add cabbage and braise. Sprinkle with flour, stir well, add water and boil 1-1/2 to 2 hours, to taste.

Pickle Soup

1 small pickle or 1/2 a large pickle
2 tbsp. fat
4 tbsp. flour
1-1/2 ltr. water
1-2 tbsp. vinegar, salt

Make a roux of fat and flour, slowly add water. When boiling, add diced pickle. Add salt and vinegar to taste.

Sauerkraut Soup

As pickle soup above, instead of pickle use sauerkraut.

Carrot Soup

3 large carrots
1 small onion
2 tbsp. fat
4 tbsp. flour
1-1/2 ltr. water from cooking carrots
1 tsp. parsley
1 tsp. sugar, salt

Peel the carrots, cut into small pieces, cook until done then push them through a strainer. Cook fat, onions and flour together, then pour in the carrot water. Add carrots, boil well, season with salt, parsley and sugar. If desired, you can replace half the carrots with potatoes; just use 1 less tablespoon of flour.

Baked carrot and potato dumplings

2 lbs. potatoes
2 lbs. carrots
2 tbsp. milk
salt, pepper
60 grams fat

For the sauce:
1 tbsp. fat
2 tbsp. flour
3/8 ltr. water from cooking the carrots, salt
1 tbsp. parsley, a little sugar

Boil the potatoes and carrots and push them through a strainer. Mix with salt and pepper, then form dumplings. Press them a bit flat, and fry in a frying pan until brown. To make the sauce, fry the flour and fat until yellow, pour in the carrot water, and bring to a boil. Season with salt, sugar and parsley.


Thursday, April 27, 2017

Uniform and equipment issue lists for soldiers in Landesschützen and Sicherung units

The Soldbuch was the standard identity document carried by every Wehrmacht soldier. Among the information recorded in this document was a complete list of uniform and equipment items, that the soldier was issued. This information is an extremely valuable resource for anyone trying to learn what was issued to soldiers in specific units, or types of units.

Gefreiter Josef Foschiatti was assigned to occupation duty in Norway with Festungs-Bataillon 655, Sicherungs-Bataillon 668, and Feldkommandantur 200. In his Soldbuch picture, which dates from 1943 or 1944, he wears an M36 tunic. His collar Litzen are improperly folded and crudely hand sewn with thick dark thread.
The uniform and equipment issue insert in his Soldbuch is very interesting. The "Tornister 34 m. Trager." and "Tornister 39" are printed as separate items. Foschiatti had the 34 model, with integral shoulder straps, as late as April 1945. He also had 3 collar binds and 1 pair "Tragegurten" which I were the internal suspenders for the M36 and M40 model field blouse. He had jackboots. It is likely that this soldier in 1945 had what we might regard as an "early war" appearance.

His uniform and equipment issued by Sicherungszug 280 in April 1945:

1 field cap
1 field blouse
1 HBT jacket
1 pair wool pants
1 pair HBT pants
2 pair underwear
1 pair sports shorts
1 overcoat
1 Zwieback bag
3 collar binds
2 shirts
1 sweater ("Schlupfjacke 36")
3 pairs socks, 1 pair foot wraps
1 pair jackboots
1 helmet
1 Tornister 34 with straps
1 pair slippers
1 butter dish
1 Zeltbahn and accessories
1 belt with buckle and bayonet frog
3 equipment straps
1 bread bag with strap
1 canteen with cup
2 mess kit straps
2 ammo pouches
1 mess kit
1 ID disk
2 hand towels
1 eating utensils
1 handkerchief
5 cleaning brushes
1 pair internal suspenders
1 sewing pouch
1 blanket


Foschiatti also had a rifle, a bayonet, an entrenching tool, a gas mask model 1930, a gas sheet, 4 Losantin containers, an RG34 rifle cleaning kit, and bandages- 1 large, 1 small.

Here is the uniform and equipment issue record for another soldier, Gefreiter Rudolf Mainz.
Mainz was issued the following while serving with Landesschützen-Btl. 442 on September 23, 1944:

2 field caps
1 field blouse
1 HBT uniform...
2 wool trousers
2 pair underwear
1 overcoat
2 collar binds
2 shirts
1 sweater
1 toque
1 pair gloves
1 pair leg warmers
1 pair socks
1 pair low boots
1 Waffenrock
1 helmet
1 rucksack
1 belt
3 equipment straps
1 bread bag without strap
1 canteen
1 ammo pouch
1 hand towel
2 handkerchiefs
1 pair suspenders
1 ID disk
3 pairs shoulder board unit slip-ons

He also got a captured French rifle and bayonet on the same date. Specifically, a Berthier Mle 1907/1915.

Wednesday, March 1, 2017

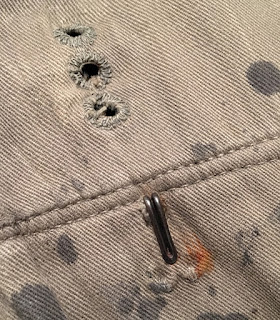
Internal suspender retaining hooks on German Army M36 and M40 field blouses

Every factory made enlisted issue M36 and M40 field blouse was lined in such a way to accommodate the internal suspenders that held the belt hooks in place. Part of this system was two small wire hooks sewn into the field blouse liner, below the belt hook eyelets on each side. These hooks retained the ends of the internal suspenders. There were no corresponding retaining hooks below the rear belt hook eyelets.

A small sample of original enlisted issue M36 and M40 field blouses was examined to determine what types of suspender retaining hooks were used and how they were positioned.

Garment 1: M40 field blouse, Erfurt depot 1940


This field blouse is stamped with a torso length of 41 centimeters and a total length of 68 centimeters. The retaining hooks are 17 millimeters long and are located 21 millimeters from the bottom edge of the lowest belt hook hole (note: this is the distance from the top of the retaining hook to the bottom edge of the eyelet opening- not the stitching). The hooks are blackened steel.

Garment 2: M40 field blouse, depot and date stamp illegible


This field blouse has the exact same length measurements as the previous example. Theretaining  hooks are only 19 millimeters from the belt hook eyelet. The steel hooks have corroded and it was not possible to determine the original finish. These hooks were also 17 millimeters long.

Garment 3: M36 field blouse, Erfurt depot 1939


This field blouse is stamped with a torso length of 43 centimeters and a back length of 71 centimeters. The lower pockets were moved up when this garment was retailored for reissue. The retaining hooks are 16 millimeters long and have a bright finish. They are 47 millimeters below the belt hook eyelets.

Garment 4: M40 field blouse, Erfurt depot 1940


This field blouse has identical length measurements to the previous example, and identical 17 millimeter long bright finish hooks. As on the previous example, the pockets were moved from the factory positioning; this example was retailored for an officer. The retaining hooks on this example are 28 millimeters from the belt hook eyelets.

It was noted that the positioning of the retaining hooks differed on field blouses with identical lengths. Garments 1 and 2 show the retaining hooks applied with the top edge of the hook just at the lower row of pocket flap stitching. Garments 3 and 4 were altered, the hooks no longer line up with the pocket flap stitching- but the traces of the original factory stitching are discernible and on both examples, the top edge of the hook lines up with the lowest row of the original factory pocket flap stitching. The conclusion based on this small sample, then, is that the retaining hooks were positioned not based on the belt hook eyelet positioning, but rather they were positioned immediately below the pocket flap stitching.

Wednesday, February 22, 2017

Small buttons on the German Army field blouse

A small sample of original WWII German Army enlisted issue uniform jackets was examined to assess what kind of small buttons were applied at the factory. M36, M40, M42 and M43 jackets were examined, as well as one factory converted Dutch reissued field blouse.

M36, M40, M42 and M43 field blouses each had ten small buttons in addition to the larger pebbled metal front placket and pocket closure buttons. These small buttons measured approximately 14 mm in diameter. Five were used in the collar to affix the collar bind, one closed the internal bandage pocket, and two were used to secure each cuff closure. The following types of buttons were observed in this small sample.

Horn

Horn buttons were the most common in this small sample. Here are two on an M36 field blouse. These buttons vary in color from a pale gray to nearly black, sometimes (as here) on the same garment.
 On an M40 field blouse:
 On an M43 field blouse made in 1944:

Glass

Glass buttons were observed in this sample on M42 and M43 field blouses.
 This was on an M43. A different color shade.

Pressed Paper

Pressed paper buttons were factory applied on two of the jackets examined.


 Plastic

Gray and black buttons made of an apparently synthetic material that appears to be similar to modern plastic were also found. This is an M43 jacket made in 1944.
Black plastic button on the converted Dutch jacket. The collar and buttons were added for Wehrmacht issue.
This M40 field blouse had black plastic buttons inside but horn buttons for the cuff closures. Two jackets had different button types for the cuffs as for the buttons inside this garment. It was not possible to determine if these left the factory in this configuration, or if the cuff closure buttons were replaced.
This M43 field blouse made in 1944 has glossy black buttons that appear to be some painted synthetic material.

Most of the buttons examined that appeared to be factory sewn had been hand stitched with field gray or taupe colored thread.